How to Make Clear Ice at Home (And Why It Makes Your Ice Stamp Look 10x Better)
Your ice stamp is only as good as the ice you stamp it on.
You can have a beautifully engraved custom brass stamp, the perfect logo, a great cocktail in hand — and still end up with a blurry, faded impression that disappears in seconds. Nine times out of ten, cloudy ice is the culprit.
Learning how to make clear ice at home is the single biggest upgrade you can make to your stamping results. In this guide you'll learn:
- Why cloudy ice kills your stamp impression
- The science behind directional freezing (and why it's the only method that works)
- Two practical methods you can start today — one requires no special equipment at all
- A step-by-step stamping technique that gets sharp results every time
- The most common mistakes and how to avoid them
Why Cloudy Ice Ruins Your Ice Stamp Design
Most home freezer ice looks cloudy for a straightforward reason: when water freezes from all sides simultaneously, dissolved air and minerals get pushed toward the center with nowhere to escape. They become trapped inside the cube as thousands of tiny bubbles — and those bubbles scatter light, giving ice its white, opaque appearance.
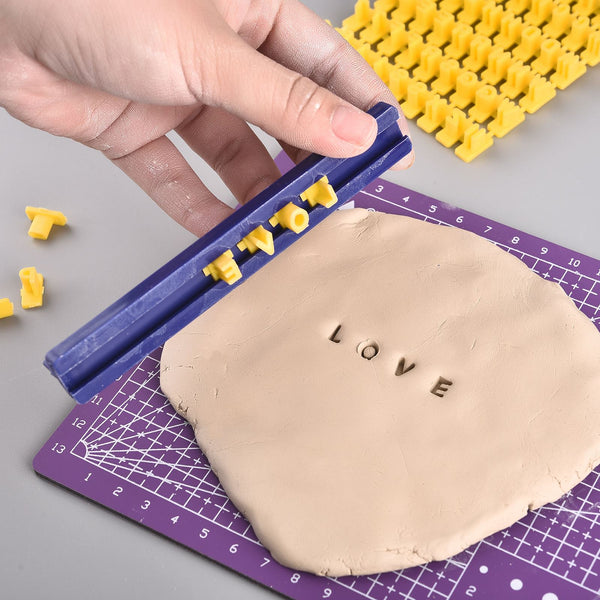
Now press your ice stamp onto that surface.
The brass head melts a shallow layer of ice to create the impression. On cloudy ice, the surface is riddled with micro-cavities and inconsistencies. The stamp can't make full, even contact — so you get a patchy, indistinct imprint that fades almost immediately.
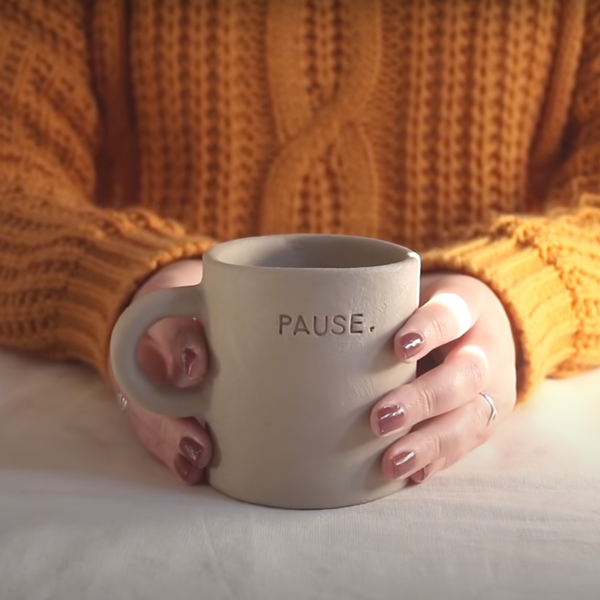
Clear ice is fundamentally different. It's denser, with far fewer air pockets. When your stamp presses into it, the heat from the brass melts a perfectly even layer and the design transfers with sharp, high-contrast edges. The impression sits deeper and holds longer — sometimes staying visible for the entire life of the drink.
There's a practical bonus too. Because clear ice contains fewer impurities, it melts more slowly than cloudy ice. That means your stamped design has more time to shine in the glass — and your drink stays cold longer without diluting.
What Is Directional Freezing (And Why It's the Only Method That Works)
You've probably seen suggestions online for making clear ice: use distilled water, boil it first, double-boil it. Here's the honest truth — none of those methods produce crystal-clear ice on their own.
A food scientist writing for The Conversation put it plainly: it's not the water quality that guarantees clear ice. It's all about how you freeze it.
The technique is called directional freezing. The idea is simple: instead of letting water freeze from all sides at once (which traps impurities in the center), you force it to freeze from the top down. The impurities and dissolved air get pushed ahead of the freezing front — downward, into the still-liquid water below — and never become trapped in the ice at all.
In nature, you see this happen in ponds and lakes every winter. The surface freezes first, slowly pushing air beneath it. The ice at the top is crystal clear. The method mimics exactly that process in your freezer.
Why boiling alone doesn't work: Boiling removes some dissolved oxygen, which helps a little, but it doesn't control the direction of freezing. Pour boiled water into a standard ice tray and it still freezes from all sides. You'll get clearer-than-average ice — but not clear ice.
Why distilled water alone doesn't work: Same problem. Purer water still freezes omnidirectionally in a standard tray, trapping whatever trace impurities remain right in the center.
To make truly clear ice, you need to insulate the sides and bottom of your water container so that the only heat exchange happens through the top. Two practical methods accomplish this at home.
Method 1: The Cooler Method (Free, No Special Equipment)
This is the classic approach, and it works. All you need is a small hard-sided cooler that fits in your freezer.
What you need:
- A small hard-sided cooler (a 9-quart picnic cooler works well)
- Tap water — warm, not boiling
- A serrated bread knife
- A freezer with enough space for the cooler
Steps:
- Fill the cooler with 4–5 inches of warm tap water. Don't overfill — you want the ice block to be manageable.
- Leave the lid off and place the cooler in the freezer. The open top allows cold air to hit the water surface first, initiating top-down freezing. The insulated sides prevent cold air from attacking from all directions.
- Freeze for 18–24 hours. You want several inches of clear ice on top, with some liquid water still remaining at the bottom (that's where the impurities collect — you don't want that to freeze).
- Remove the cooler and turn it upside-down over a sink. Let it sit for 5–10 minutes. The ice block should release on its own.
- Cut into cubes using a serrated knife. Score the top surface in a grid, then apply gentle pressure to snap the ice apart. A 2-inch cube is ideal for stamping.
- Temper before use. Let cubes sit at room temperature for 1–2 minutes before stamping. This prevents thermal shock cracking.
Pros: Free, uses equipment you already own, produces large blocks you can cut to any shape.
Cons: Takes up freezer space, requires cutting, yield depends on how long you freeze.
Method 2: Clear Ice Cube Trays (Easier, More Consistent)
If you want consistently sized, stamp-ready cubes without the cutting step, a dedicated clear ice tray is worth the investment.
These trays are a miniaturized version of the cooler method. They use a two-part design: an insulated outer shell and a silicone mold that sits inside. Water freezes from the top down through the mold cavities, pushing air and impurities into a reservoir below. When you remove the tray, the bottom section (cloudy ice and water) separates cleanly from your clear cubes.
Key features to look for:
- 2-inch cube cavities — the standard size for stamping and cocktail use
- Insulated outer container — the quality of the insulation determines the clarity of the result
- Hole-bottom mold design — allows impurities to exit the cube as it freezes
Pros: No cutting required, consistent cube size, compact enough to fit in a standard freezer.
Cons: Initial cost, limited batch size compared to the cooler method.
Which method should you choose? If you only need a few cubes for a weekend cocktail session, a dedicated tray is the most convenient option. If you're making stamped drinks for an event, the cooler method gives you more volume and flexibility.
How to Get the Perfect Ice Stamp Impression Every Time
Clear ice sets you up for success — but technique still matters. Follow these steps for a clean, sharp impression every time.
Step 1 — Temper the ice (non-negotiable)
Remove your clear ice cube from the freezer and let it sit at room temperature for 1–2 minutes before stamping. Freshly frozen ice is under thermal stress and will crack under pressure. Tempering raises the surface temperature just slightly, making the surface receptive to the stamp's heat without shocking the ice.
Step 2 — Keep your stamp at room temperature
A common question: should the stamp be warm, cold, or room temperature? Room temperature is the answer. The brass head of a custom ice stamp has excellent thermal conductivity — it transfers enough heat to melt a clean impression without any pre-heating. Some guides recommend warming the stamp, but this risks melting too deeply. Room temperature gives you control.
Step 3 — Apply firm, even downward pressure
Place the stamp flat on the ice surface. Press straight down with steady, even pressure for 2–4 seconds. Do not rock the stamp or apply pressure from one side — that skews the impression.
Step 4 — Lift with a slight twist
To release cleanly, give the stamp a very slight twist (about 5°) before lifting. This breaks any surface tension between the brass and the ice and prevents pulling the impression apart.
Step 5 — Serve immediately
Stamped ice looks best in the first few minutes. Serve the drink right after stamping for maximum visual impact.
Common Mistakes to Avoid
Even with clear ice and a quality stamp, a few easy mistakes can undercut your results.
Stamping straight from the freezer. The most common error. Ice that goes directly from a -18°C freezer to room temperature is under significant thermal stress. Press a stamp into it and the ice cracks — sometimes dramatically. Always temper first.
Using cloudy ice and expecting a sharp impression. The air bubbles in cloudy ice act as weak points in the structure. The stamp presses unevenly, the design blurs, and the impression collapses quickly. Clear ice is the foundation everything else is built on.
Applying too much pressure. More pressure does not mean a deeper or better impression. Excess force cracks the ice and distorts the design. Firm, controlled pressure for 2–4 seconds is all you need.
Not drying the stamp between uses. Water on the stamp surface refreezes on contact with ice, blurring edges. After each use, wipe the stamp face dry with a clean cloth before stamping the next cube.
Using ice that's too small. A cube smaller than 2 inches doesn't give the stamp enough flat surface area to produce a complete impression. Match your stamp size to your cube size — a custom brass ice stamp works best with 2-inch cubes.
Storing ice uncovered. Ice absorbs odors from the freezer. Store your clear cubes in a sealed container or bag to keep them clean and odor-free until use.
Conclusion
Making clear ice at home is simpler than most people think. You don't need expensive equipment — a cooler you already own and 24 hours is enough to produce cubes that rival what you'd find at a craft cocktail bar.
The payoff when you combine clear ice with a custom ice stamp is immediate: sharp, high-contrast impressions that hold their shape, photographs that actually look like the real thing, and a level of presentation that makes every drink feel intentional.
Here are the key takeaways:
- Directional freezing is the only reliable method — water quality changes alone won't produce clear ice
- The cooler method is free and works for anyone with a standard freezer
- Dedicated clear ice trays offer convenience and consistent cube sizes
- Always temper your ice for 1–2 minutes before stamping to prevent cracking
If you already have a custom ice stamp — or you're thinking about getting one — investing 24 hours in a batch of clear ice is the fastest way to dramatically improve your results. Order your custom brass ice stamp from Stampty and see the difference clear ice makes on the very first pour.
Frequently Asked Questions
Does ice have to be clear for an ice stamp to work?
No — an ice stamp works on any ice. But cloudy ice has trapped air bubbles that scatter light and soften the imprint. Clear ice is denser, so the stamp presses into a smooth, uniform surface and the design stays sharp and visible far longer.
How long does it take to make clear ice at home?
Using the cooler method, plan for 18–24 hours. Dedicated clear ice trays take a similar amount of time. The key is slow, one-directional freezing — rushing it produces cloudy results.
What size ice cube works best with an ice stamp?
A 2-inch (50mm) cube is the sweet spot. It gives the stamp enough flat surface area to produce a clean, complete impression — and it's large enough to melt slowly in a whiskey or cocktail glass.
Can I use boiled water to make clear ice?
Boiling removes dissolved gases, which helps slightly, but it doesn't control the direction of freezing. Water frozen in a standard tray will still turn cloudy. Directional freezing is the only reliable method.
How do I stop my ice stamp design from cracking the ice?
Temper the ice first — let it sit at room temperature for 1–2 minutes before stamping. Freshly frozen ice is under thermal stress and cracks easily under pressure. Tempering raises the surface temperature just enough to accept the stamp cleanly.